Heatit WM Dimmer

# 1. INTRODUCTION
Heatit WM Dimmer is a 250W dimmer suitable for use with LED lights and other types of light sources. The dimmer works with most low loads without causing flicker. It can be controlled via Wi-Fi or Bluetooth (BLE) using the "MyHeatit" App or via a wired switch. Heatit WM Dimmer is designed for hidden installation in a standard European junction box or within the Heatit Strain Reliever.
All Heatit products with Wi-Fi support and marked with the MyHeatit logo, can be controlled via our "MyHeatit" App. In the app, you can create profiles such as "Home", "Away", "Night", and "Work" to easily control your connected devices. The app also offers scheduling and sunrise/sunset automation, allowing lighting to be controlled automatically according to local sunrise and sunset times.
The installer configures the system via Wi-Fi. If Wi-Fi is not available, the system can be configured via Bluetooth. After the system is set up, the installer can transfer the property to the customer. The customer can then add the system to their local Wi-Fi network.
When used with Wi-Fi, the dimmer can communicate over a local API, allowing the user to integrate it with a local gateway, server, or controller that offers such a service, without the need to connect it to the cloud. The device also supports Amazon Alexa and Google Home.
The dimmer has 2 switch inputs that, in addition to controlling the dimmer, can be used as scene controllers.
The dimmer can be connected wirelessly to other devices via DirectLink. It can be controlled by other dimmers and switches, and it can also control other dimmers.
Heatit WM Dimmer features power metering, providing real-time information about your power consumption.
# 2. INSTALLATION DISCLAIMER
Installation must be done by a qualified electrician in accordance with national building codes.
Before installation, disconnect the power to the device from the mains. During installation of the device, power to the device must be disconnected AT ALL TIMES!
# 3. QUICK START
Upon connecting the device to power, it will automatically enter add mode for a duration of 60 minutes.
1.Switch off the mains voltage (disable the fuse).
2.Open the junction box.
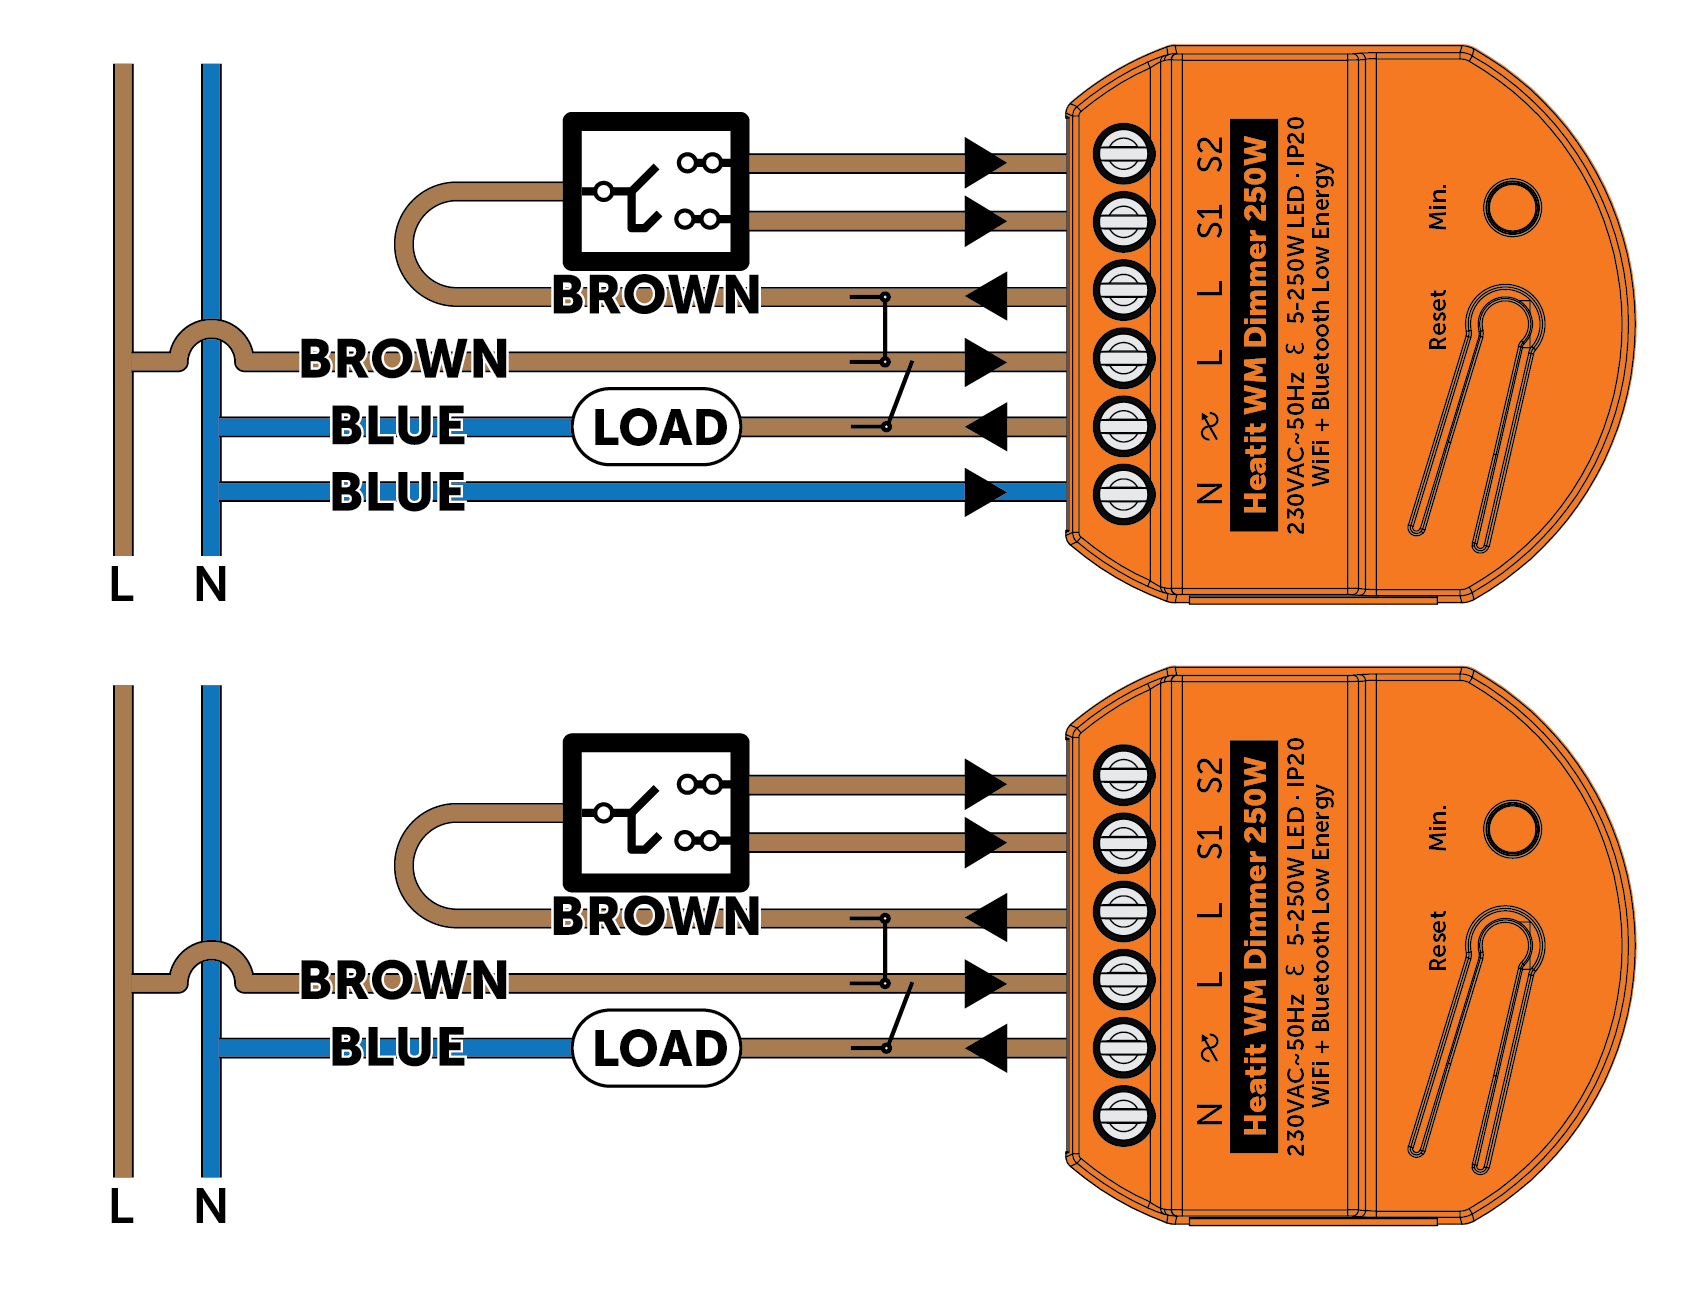
3.Connect the wires according to the description in chapter "Connections". Optional: Connect external wired switches.
4.After verifying the connections, switch on the mains voltage.
5.In the "MyHeatit" App, choose "Add Device", enter your Wi-Fi details, search for and select your device.
6.The device's internal LED will light up green for 3 seconds when successfully added.
If the cable used has multiple strands, an end sleeve is advised. The product allows for wiring of cables with a cross section of up to 1x2.5mm2.
| Terminal | Description |
| --- | --- |
| N | Power connection (Neutral) 230VAC. |
| Load output | Load connection (Light). |
| L | Power connection (Live) 230VAC. |
| L | Power connection (Live) 230VAC. |
| S1 | External momentary switch. Used for dimming the load. Can be used as a scene controller. |
| S2 | External momentary switch. Can be used for either dimming or as a scene controller. |
## 4.1. Wiring diagram
# 5. LED BLINKING PATTERNS DESCRIPTION
## 5.1. Device Not in Network
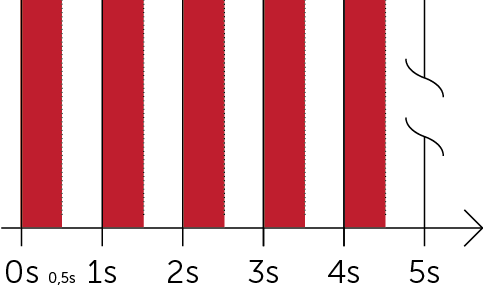
The LED will flash in red when the device is not added to WiFi or Bluetooth.
 ## 5.2. Add mode
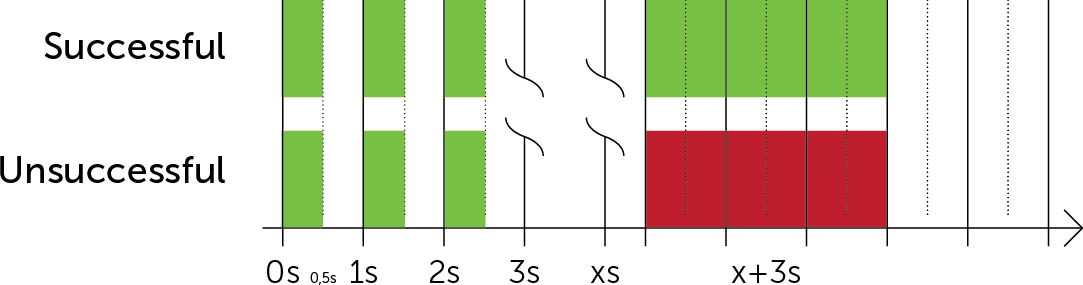
When device enters add mode the LED will flash green. If successful, the LED will light up in green for 3 seconds. If unsuccessful, the LED will light up in red for 3 seconds.
## 5.2. Add mode
When device enters add mode the LED will flash green. If successful, the LED will light up in green for 3 seconds. If unsuccessful, the LED will light up in red for 3 seconds.
 ## 5.3. Factory Reset
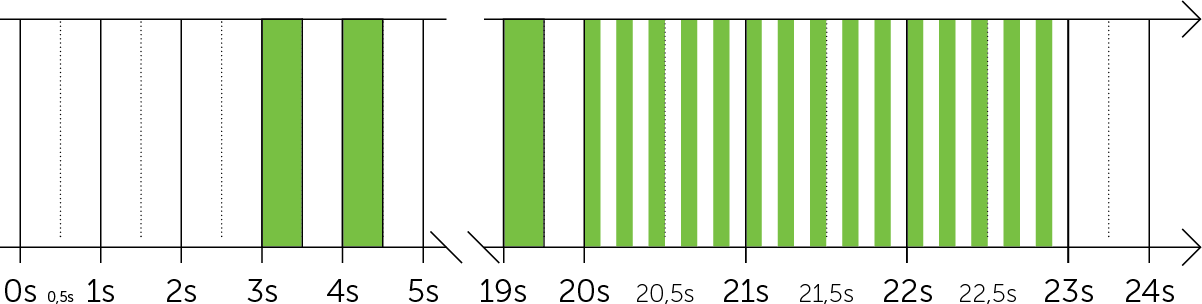
If the button is held for more than 3 seconds, the GREEN LED will start blinking with 0.5s intervals.
## 5.3. Factory Reset
If the button is held for more than 3 seconds, the GREEN LED will start blinking with 0.5s intervals.
When the button has been held for 20 seconds, the GREEN LED will blink rapidly with 0.1s intervals for 3 seconds.
### 5.3.1. Figure 1 (success)
Within the 3 second period the reset button must be released. If the reset button is released within this period, the device will indicate that it has been successfully reset by lighting up in solid green for 3 seconds. The device will then start blinking green because it enters add mode for the first 60 minutes.
 ### 5.3.2. Figure 2 (fail)
If the reset button is released before the 3 second period, the device will indicate fail by turning red LED on for 3 seconds.
### 5.3.2. Figure 2 (fail)
If the reset button is released before the 3 second period, the device will indicate fail by turning red LED on for 3 seconds.
 ### 5.3.3. Figure 3 (fail)
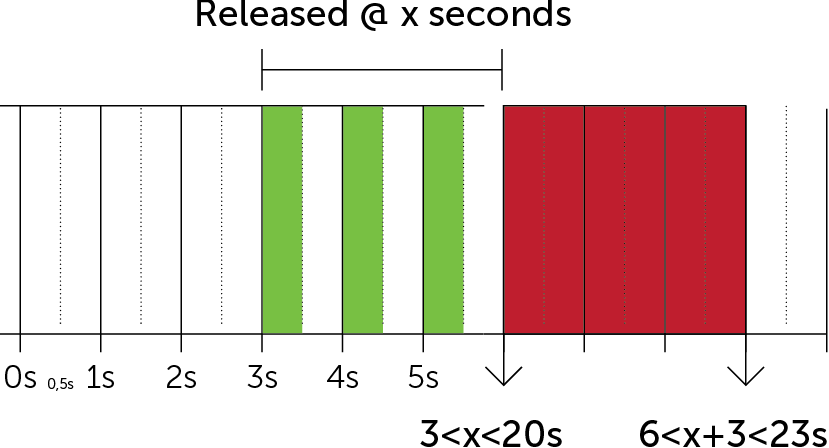
The reset button MUST be released between 20 and 23 seconds for local reset to take place. If held longer, the device will ignore the command.
### 5.3.3. Figure 3 (fail)
The reset button MUST be released between 20 and 23 seconds for local reset to take place. If held longer, the device will ignore the command.
 # 6. STARTUP
After powering up the device for the first time, all parameters will have default settings.
# 7. WI-FI NETWORK SELECTION
The device supports 2.4GHz networks only.
# 8. ADD/REMOVE
**Please read this before installation**
Upon connecting the device to power, it will automatically enter add mode for a duration of 60 minutes. During this time the device can be added to the App without starting add mode locally on the device.
To remove a device, find the device in the "MyHeatit" App and choose "Delete this device". If this is not possible, perform a "Factory reset".
## 8.1. Wi-Fi and Bluetooth
Manual add mode is indicated on the device by LED blinking green. It indicates this for 90 seconds until a timeout occurs, or until the device has been added to the network. Add mode may also be cancelled by performing the same procedure as for starting add mode.
Automatic add mode is shown by a blinking green LED for 60 minutes after power is applied if the device is not already included.
To include the device in the app, using either Wi-Fi or Bluetooth.
# 6. STARTUP
After powering up the device for the first time, all parameters will have default settings.
# 7. WI-FI NETWORK SELECTION
The device supports 2.4GHz networks only.
# 8. ADD/REMOVE
**Please read this before installation**
Upon connecting the device to power, it will automatically enter add mode for a duration of 60 minutes. During this time the device can be added to the App without starting add mode locally on the device.
To remove a device, find the device in the "MyHeatit" App and choose "Delete this device". If this is not possible, perform a "Factory reset".
## 8.1. Wi-Fi and Bluetooth
Manual add mode is indicated on the device by LED blinking green. It indicates this for 90 seconds until a timeout occurs, or until the device has been added to the network. Add mode may also be cancelled by performing the same procedure as for starting add mode.
Automatic add mode is shown by a blinking green LED for 60 minutes after power is applied if the device is not already included.
To include the device in the app, using either Wi-Fi or Bluetooth.
1.Ensure device is in either manual, or automatic add mode.
1.1.Manual add mode
-Press the reset button three times rapidly.
1.2.Automatic add mode
-Power on the device and proceed within 60 minutes.
2.In the "MyHeatit" App, choose "Add Device".
3.Choose Wi-Fi or Bluetooth.
4.Search for your device and select it or scan the QR code.
Go into the settings on the device you want to update and press "Update Firmware" button. This will check if a newer version is available, if there is one, it will be downloaded and installed.
# 19. SAFETY FEATURES
The device has safety features to ensure safe operation and warn the user of any faults/unexpected behavior.
## 19.1. Overheating
The device features internal temperature sensors that detect overheating. It warns the user and turns off the output to prevent any damage.
When overheating is detected, the device will:
-Turn off the output.
-Send a notification through the "MyHeatit" App.
-Turn off the output.
-Send a notification through the "MyHeatit" App.
·WiFi (2.4GHz)/BLE
·Open API for integration
·Profiles; Home - Away - Night - Work
·Sunrise/sunset automation
·DirectLink
·2 or 3-wire
·5W - 250W LED
·Scene Controller
·2 switch inputs
·Adjustable Min. dim level
·Maximum dim level autocalibration
·Overload protection
·Short circuit protection
·Surge protection
·Overheat protection
·Google Home, Amazon Alexa
·Power metering
·Firmware update (OTA)
 # 25. DISCLAIMER
Do not dispose of electrical appliances as unsorted municipal waste, use separate collection facilities. To prevent possible harm to the environment or human health from uncontrolled waste disposal, recycle it responsibly to promote the sustainable reuse of material resources. To return your used device, please use the return and collection systems or contact the retailer where the product was purchased. They can take this product for environmental safe recycling.
# 25. DISCLAIMER
Do not dispose of electrical appliances as unsorted municipal waste, use separate collection facilities. To prevent possible harm to the environment or human health from uncontrolled waste disposal, recycle it responsibly to promote the sustainable reuse of material resources. To return your used device, please use the return and collection systems or contact the retailer where the product was purchased. They can take this product for environmental safe recycling.

We develop and design our products in accordance with our strict quality requirements (ISO 9001) and environmental requirements (ISO 14001). All electrical installations must be carried out by an authorized electrical installer. The product must be installed in accordance with our installers manual and national building codes. Any wrongful installation, misuse, damage of the product, is not covered under warranty. Updated documentation is available at [www.heatit.com](http://www.heatit.com) and/or [documents.heatit.com](http://documents.heatit.com). Heatit Controls AS can not be held liable for any type of errors or omittances in our product information. Product specifications may change without further notice.
Downtime related to the App or cloud/service platform is not covered by the warranty.
# 26. COMPANY INFO


**Heatit Controls AS** · Mattisrudsvingen 19, 2827 HUNNDALEN, NORWAY
Phone: [+47 61 18 77 77](tel:+4761187777) · [post@heatit.com](mailto:post@heatit.com) · **[heatit.com](http://heatit.com)**
©2026